
.JPG)
 |
| My cake collapsed in a heap! |
 |
| What a mess! |
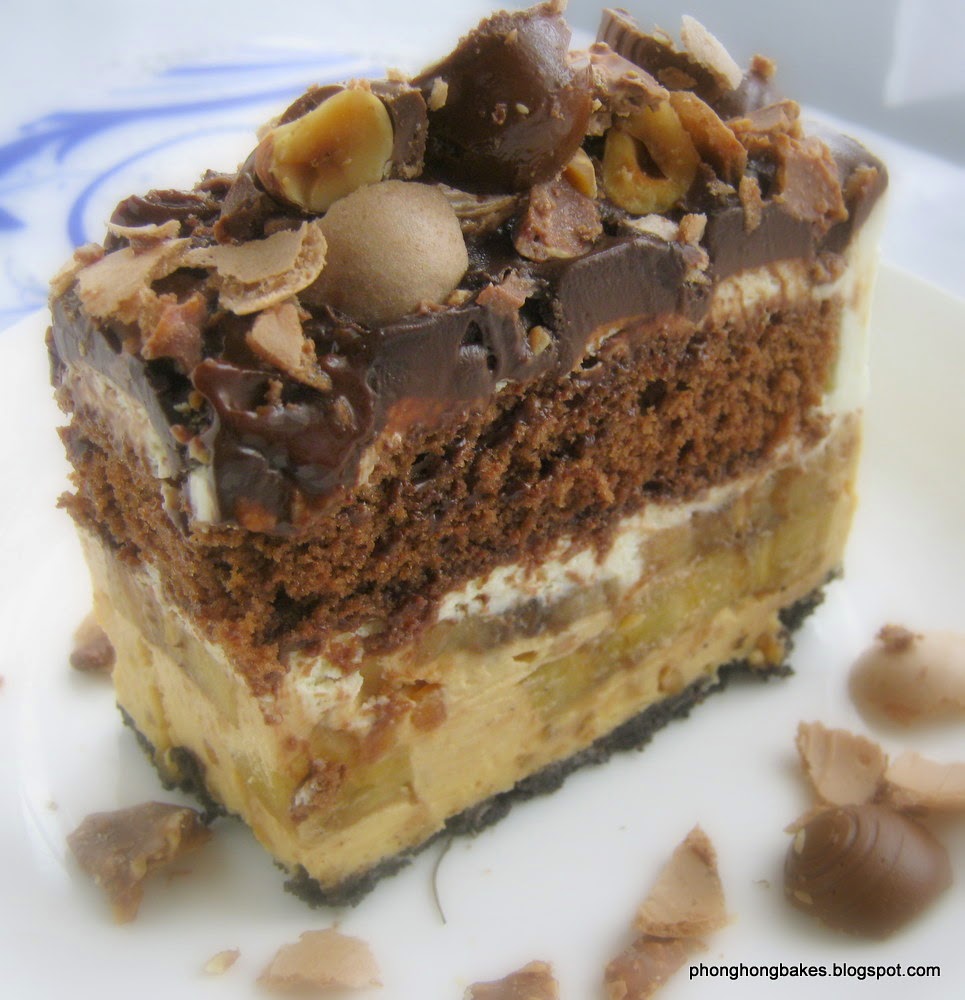
This cake is built layer by layer. It starts with a crushed Oreo biscuit base followed by a mixture of peanut butter and whipping cream, sliced bananas, whipped cream, chocolate sponge cake, whipped cream and then finally topped with ganache.
.JPG)
As we all know, the stability of a structure lies in its foundation. In this case, the foundation is the layer of bananas and creamy peanut butter and whipping cream. The bananas = bricks and the peanut butter/whipping cream = cement, if you will. Now I am starting to think like an engineer.
 |
| Peanut butter and whipping cream. I could just scoop this with a spoon. Noms! |
In my first attempt, I laid only one layer of bananas. Why? Because I had no idea that I needed more than a layer (non-engineering brain at work here). Besides, I bought only 3 Cavendish bananas (because I couldn't get pisang mas or berangan). Two I used for the cake and one I walloped on the spot. No wonder I was short of bricks :D
.JPG)
Assembling the cake is not too bad even if you are seriously lacking in finesse like me. The bottom layer is an Oreo biscuit base. You use crushed Oreos, filling and all, which is mixed with melted butter. Yes, just like making a cheesecake base. I was apprehensive about including the Oreo filling because it might be too sweet. But my worries were unfounded as I used no-sugar added peanut butter.
Now on to the "cement"'. The peanut butter and whipping cream are beaten to form a creamy and firm mixture. I knew I was going to have whipping cream flying into my face and I was right. Look at the mess. No, I did not do a selfie of my face spotted with whipping cream. It was not a pretty sight.
 |
| Whipping cream flew everywhere. |
Next, simply dump this peanut butter/whipping cream onto the Oreo base. Easy, right? After that, arrange sliced bananas on the creamy mixture. This is where I got it wrong. Tell you about it in a bit.

 |
| Must press the bananas into the peanut butter mixture and then lay another layer of bananas. |

Then a layer of whipped cream goes on top of the bananas. Next, lay a piece of sponge cake on top.


Then the remaining whipped cream goes on top of the sponge. At this point, I chilled the cake and went on to make the ganache. When that was cool enough, I poured the ganache onto the cake, tilting the pan to evenly coat the top of the cake with the melted chocolate. The cake goes back to the fridge to chill for a few hours.
My problem started when I sliced the cake. Gosh! It simply collapsed when my knife cut into it. It was all wobbly and couldn't hold its shape. Sheeeshh... This was how my first slice turned out.
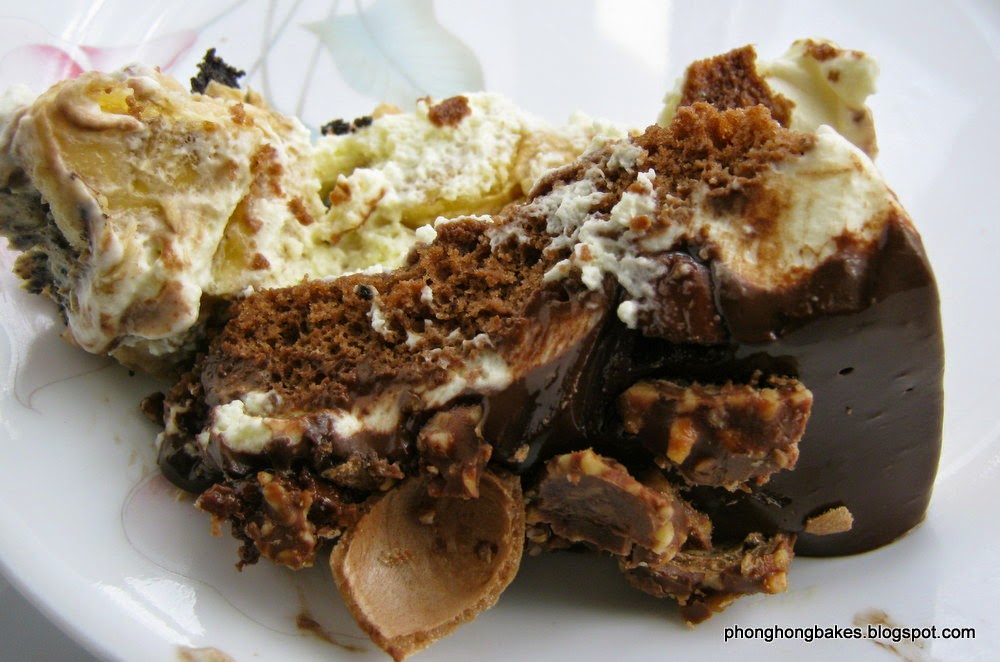 |
| What a flop! |
1. Not enough bananas = poor foundation (not enough bricks);
2. The sliced bananas should be pushed into the peanut butter/whipping cream layer; and
3. The cake should have been chilled a lot longer (overnight) in order for the peanut butter/whipping cream to set further (The cement wasn't fully set).
But as far as taste was concerned, that ugly blob of a cake was sheer bliss. It was like eating ice-cream, simply heavenly!
I was very determined to redeem myself and do justice to this fabulous recipe. I had to make this cake again and make it better! And so I did. The second time, I had 2 layers of bananas and the cake was chilled overnight. The result? Tadaah...

Now, let me give a short review on the recipe which was published in the Nutriplus cookbook, Thinking Out Of The Shell.
Cheng Yi's recipe looks simple and doable but there are many technical issues which are not spelled out for you. Obviously, if the recipe tells you all there is to know about assembling this cake perfectly, it will spill over to 2 or 3 pages long.
Then people will complain that the recipe is "cheong hei" (long winded). And seriously, from now onwards, I will not complain if I see a "cheong hei" recipe.
 |
| This is a very stable structure. |

I find it more practical to whip the remaining whipping cream first. Why? That way you need not clean your cake mixer before beating the peanut butter/whipping cream mixture. Even if you have 2 cake mixers, why do extra work?

You will need a sponge cake for this cake and though the recipe calls for Sponge Mix, I did not use that because I did not have any. Instead I baked my own sponge cake.
With my third attempt at this cake, I can now share with you my tips for making this cake successfully.

The detailed instructions will be denoted in red so that you may skip the "cheong hei" parts because I will sound like an old auntie telling you long grandmother stories.

Peanut Butter Banana Cake
Recipe source : Fatboybakes as published in Thinking Out of the Shell (page 23)
Note : I have included my notes in red for my future reference and to share some tips.
Ingredients :
- 1 packet Oreo biscuits (137g)
- 30g melted butter
- 250g chunky peanut butter (I used no sugar added)
- 600g whipping cream
- 4-5 ripe bananas, perferably pisang mas
Sponge Cake
- 125g chocolate sponge mix
- 2 eggs
- 25ml water
- 25ml melted butter
Note : I did not use a sponge mix but baked my own.
Ganache
- 150g Dark Chocolate (broken into small pieces)
- 150 cream (I used cooking cream. Can also use whipping cream)
- 10g butter (my addition)
Method :
1. Grind the Oreo Biscuits together with their fillings in a food processor until fine. (I just bashed them up in a plastic bag). Add melted butter and combine well.
2. Press mixture into the bottom of an 8" round tin with a removable base.
3. (I do step 6 first before proceeding to steps 3, 4 and 5)) Place peanut butter and 240g whipping cream in the bowl of a mixer. Whisk until the mixture is light, fluffy and firm. (I placed the peanut butter in a mixing bowl and drizzled the whipping cream into the bowl while whisking the peanut butter. This prevents the whipping cream from flying everywhere).
4. Spread the mixture over the biscuit base. (I poured the whole lot onto the biscuit base and used the back of a spoon to spread the mixture).
5. Slice the bananas and lay over the peanut butter layer. (After laying the first layer, gently press the banana slices into the peanut butter layer. Then lay the second layer of bananas on top. Press to make sure that your banana layers are compacted into the peanut butter layer).
6. Whip the remaining whipping cream until stiff peaks form. Be careful not to overbeat. (I do this as step 3 and set the whipped cream aside in the fridge before proceeding to beat the peanut butter at steps 3, 4 and 5).
7. Lay a layer of the whipped cream to cover the bananas. (You want enough cream to cover the bananas. Use more here than at the end. Use the back of a spoon to spread the cream).
8. Lay a layer of the sponge cake on the cream.
9. Spread the remaining cream over the cake, and pour over the cooled chocolate ganache (After spreading the cream on the cake, I placed the cake in the fridge. Then I made the ganache. When the ganache was cool enough, I poured it over the chilled cake. To spread the ganache, tilt the pan).
10. Refrigerate for a few hours (It is best to refrigerate overnight).
To make the sponge :
1. Place sponge mix, eggs and water into the bowl of a mixer and whisk until thick and pale.
2. Add butter and mix a little bit more until incorporated.
3. Pour into a lined 8" round tin and bake at 170C for 15 minutes or so.
(I baked my own chocolate sponge cake from scratch).
To make the chocolate ganache :
1. Bring the cream to a boil.
2. Pour the hot cream over the dark chocolate and leave to sit for a few minutes (5 minutes).
3. Stir the chocolate mixture which should form a glossy ganache.
Note : I placed the chocolate and butter into a glass measuring jug to make it easier to pour the ganache)

This post is linked to the event, Little Thumbs Up organised by Zoe of Bake for Happy Kids and Doreen of My Little Favourite DIY and hosted by Faeez of BitterSweetSpicy.

Ooooo lala !! I see your first picture already very hoi wai jor la.. Looks like bakery punyer cake leh.. Look at those creamy sweet banana layer at the bottom..3 layers of bananas, eh, if me also ahh, if I do it first time, I will also put 1 layer only leh.. But then, I'm thinking, you will need a very strong "bricks+cement" coz we have to put the cake on top.. The cake must be real soft and light to be able to sit on top of the "bricks+cement".. The cake is so beautiful Phong Hong, I love peanut butter, I love bananas.. So, you made this two times.. The first time, who finished all the cake? I don't mind you know, just scoop with a spoon, no need to cut, since it collapsed, like you said..
ReplyDeleteLouiz, thank you! This cake very kancheong and heartache one. So far I have made this 3 times. It is a good cake and worth the effort. The first cake though all pecah-pecah, I managed to give away because the taste was so good. If ugly and not tasty, then it would have gone into the tong sampah LOL!
Deletepeanut butter chocolate banana cake!!! OMG this cake already sounds sinful as it tastes, haha.. well well well, it does look very sexy in the photo before you cut it, and my, you still have one very "successful" slice that you can show us here too!! and I guess that was the same slice that you took lots of photos from different angles to show us a series of images here huh?? now I realize your photos of the same thing but different angles are your "separator" for paragraphs of stories!! how smart, haha!! :D
ReplyDeleteActually, it was 2 slices. Of course lah must show from many angles. Just like models on the runway, they must walk and then pusing-pusing to show the baju in every possible angle!
Deleteokay back to the cake, errr, you know I just makan only so I don't care how it looks.. of course if it looks sexy, I will be delighted and probably will take a photo to post onto Foodbook.. but in the end, the taste is all the thing!! I read how you describe it as eating ice cream, ooolala, when I see ice-cream, then i-scream!!! hahaha.. I can imagine this peanut butter chocolate cake melting in my mouth and leaving behind that very sinfully aftertaste and making me want for more!! you evil~~
ReplyDeleteYes, this cake is evil, not me :D It is a very delicious cake. Worth the effort!
DeleteHi Phong Hong, I do think you deserve a blog crush status all on your own now, that's how much I enjoy your posts :-)) May I ask whether you used diary or non-diary whipping cream? Tx! Ann/KCH
ReplyDeleteAuuww...thank you, Ann! I used diary whipping cream :)
DeleteHi again Phong Hong, your lovely cake had me 'possessed' for days. You see, I love to bake too but have my fair share of misadventure in the kitchen. I attempted this cake nonetheless and have this to share : I reckoned a thicker pb cream + banana layer would invariably make the cake more 'slippery' when cut, thus risking a land-slide. Hence I made a thinner layer of pb cream, topped the bananas, then a thinner whipped cream layer but repeated the process again. Which means that I ended up with 11 layers in total. And it remained structurally intact. Yay! Thanks for sharing again! Ann/KCH
DeleteHi Ann! Oh, that's good to hear that you attempted the cake and discovered something new to share. I am looking forwards to your post on your version of this mesmerizing cake!
DeleteHi Phong Hong, errr......I am not a blogger wor. I am from Kuching and would love to bring you out for kolo mee if you happened to be in this part of the world.
DeleteAnn, you should blog hah...hah... Oh, that's so sweet of you! I would love to eat the Kucing kolo mee!
DeleteMy email is grinch709@gmail.com. Would really love to meet you one day and make good the kolo mee offer :-)
DeleteHi Phong Hong,
ReplyDeleteI was like "Oh dear, Phong Hong!" when I saw the whipped cream splattering everywhere... but then I thought it might be fun if you can eat whipping cream while you are whipping it... LOL!
For your cake, I like to call it a well-constructed architectural yummy piece of art! You don't just admire it... You can eat and enjoy it too :D
Zoe
Zoe, yeah I licked my face where my tongue can reach LOL! I love this cake, it was worth the heartache and the effort.
DeleteOMG this one looks so tempting, but macam not easy to bake? Hehe, may be because I am getting lazy :p
ReplyDeleteHayley, only need to bake the sponge cake. The rest don't require baking. Sedap!
DeleteYou can only use your instincts when you are a well accomplished cook/baker. I always use my instincts and end up being miserable, because my instincts are always on how to cut corners! :/
ReplyDeleteBut I do agree, as an engineer, when you start baking (or cooking), you will soon realize that it is actually pretty similar to engineering. Everything will have its steps and procedure, and when you are good enough to know what you are doing then you can adapt and invent new creations! :D
Spoken like a true engineer! That's why I feel that you should be good at baking - just don't cut corners :D
DeleteI saw the first pic and was wondering why you were heartbroken...it looked a darn good looking pc of cake (and then I read on and realised it was your 2nd attempt). And that whole cake (even the unsuccessful one) looked maleficent!! Heehee! Wow, that was a lot of cake to eat between the two of you...sinful but good ;D
ReplyDeletehee..hee... I gave away most of the cake though I wish I could eat all of it!
DeleteOh. My. God.
ReplyDeleteDespite the structural instability, I am seriously drooling over them!
Lina, had to eat with spoon hah..hah..
DeletePlus, so cute lah how to explain it. LOL
ReplyDeletehee..hee..
DeleteWow, Phong Hong! I salute you! I would probably give up after the first attempt! Your cake looks divine and better than the ones in the bakery!
ReplyDeleteI find that in local cookbooks, usually the instructions are very vague. They do not really explain in detail even though the recipes might be good.
You are a true baker, you know just the right things to do to set it right!
Thank you, Joyce! Yup, very vague and if one is new to baking then that is a very big problem. That's where it is nice to share experiences on the blog. We learn from each other!
DeleteOh dear!!! The collapsed heap sure looks pathetic. Never mind, never say die...try and try again. ;)
ReplyDeleteIt sure did! And yes, try and try again and finally succeeded!
DeleteI never tried baking this kind of cake before, me lazy and stupid, still fail...
ReplyDeleteNo lah, not stupid.... You can cook so no need to bake lah hee..hee...
Deleteit looks so good! And phisics was also not my favourite lesson:)
ReplyDeleteHigh 5 Ola! I am glad I don't need to learn physics anymore :)
DeleteJust give me your phone number and I order from you, PH!!! This is just too much work for me.. no engineer myself... will end up eating nothing at all... so what's your say? hahahaa...
ReplyDeleteWah, like that I can start cake business liao hah..hah...
DeleteI am glad you didn't give up after your first try. Because you persevere, you enjoyed success. I am happy for you that finally the cake turned up so well. Congratulations! I sure would love to taste it.
ReplyDeleteThank you, Nancy! This cake was just too good to give up on. Worth every effort!
DeleteI lost for words already .....!!! Just dreaming of the peanut butter banana cake.....with a nice kopi!
ReplyDeleteYeah, it goes well with kopi!
DeleteHi Phong Hong, you are a great adventure in baking. Honestly, I will not trying making this cake or any cakes with too much ingredients. I'll just stick to simple, easy yet tasty ones but I don't mind having a piece of it from you, hehehe!
ReplyDeleteHi Kimmy! I was like you too. I simply couldn't be bothered with this type of cakes. But it was the beautiful photo in the cookbook that made me want to make this cake hee..hee..
DeleteI am so glad for your perseverance! The second cake looks like a success! And peanut butter and banana is my FAVORITE combo!!
ReplyDeleteYup, peanut butter and bananas taste so good together!
Deleteada buat tempahan ka? Can order this cake from you or not....drrollllllllll
ReplyDeleteYou and Claire will become my first two customers lah like that hah..hah...
DeleteHi Phong Hong!
ReplyDeleteThat is one impressive looking cake! Peanut butter and bananas are a match made in heaven. And you topped it off with oreos and chocolate?! That just makes it irresistible!
Hi Sharon! Thank you for the compliments :) I love this cake a lot!
DeleteThank you Phong Hong for sharing with us what you have learned the hard way - from experience. Those notes in red will be very useful indeed for people who plan to make this cake. I wonder will Realgunner be making this cake soon as he is an engineer, hehehe.
ReplyDeleteMun, always a pleasure to share! Yeah, would be fun if RG made this :)
DeleteYou always make the most sinful looking cakes and eat them too! Looks awefully delicious! Even the flopped ones……:)
ReplyDeleteThank you, Jeannie! This cake is truly delicious. Yeah, even the flopped one hee..hee...
DeleteHi Phong Hong,
ReplyDeleteBravo ! 3rd attempt! I would have probably given up the same recipe if it didn't turn out well on my 2nd attempt. This Peanut Butter Banana Cake of yours looks so yummy-licious. I agree with Jeannie. .. 'sinful but looks delicious' ... hee hee!
Karen, I was very determined because the cake tasted so good, If the taste was just so-so, I would have given up liao hee,,hee..
DeleteYummy. Would like to try out your recipe this weekend. The "cream" for ganache, what cream are you referring to?
ReplyDeleteHi Chris! You can use either whipping cream or cooking cream. In this particular instance I used cooking cream. I have updated the recipe as "cream" was what was stated in the cookbook :)
Delete